WordPressで記事一覧表示をカスタマイズ~!!!
仕事でも今後WordPressを使っていくぽいから自分のこのサイトでいろいろ実験してみたら、すごい色々できることを知って、いかに今まで活用していなかったのかが浮き彫りに…?
PHPよくわかっていないレベルでもなんとかなりました…!!(
参考サイト様本当にありがとうございます🙇♀️🙇♀️🙇♀️
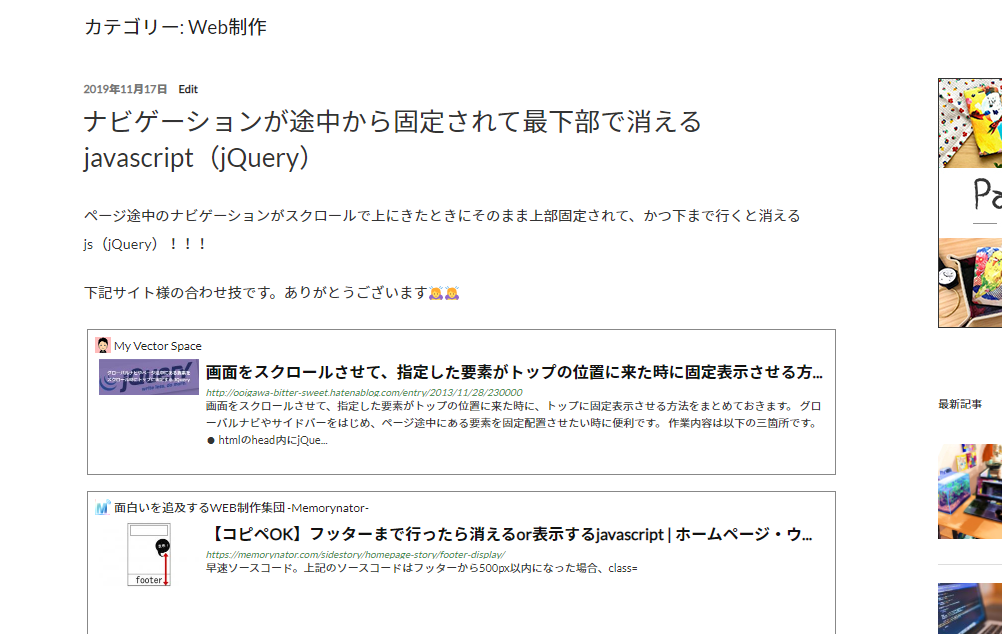
ちなみに元の一覧ページがこちら💁
記事全文が表示されています。
今回目指したのは
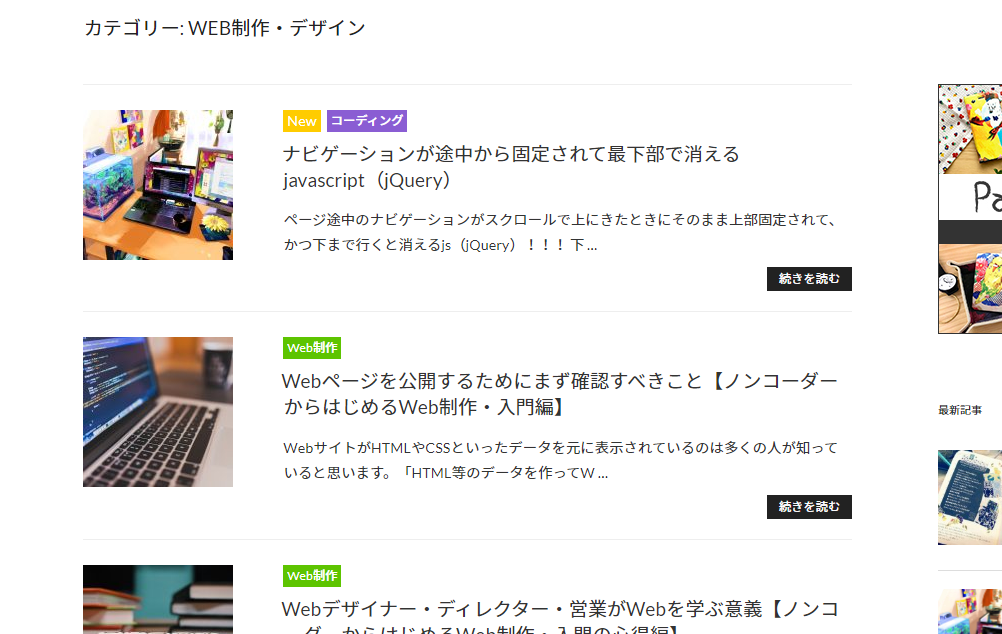
- 記事のタイトルと抜粋を一覧表示する
- 記事の1枚目の画像をサムネイルにする(トリミングして表示)
- 新着記事に「New」をつける
- タグをそれぞれ色変えて表示する
です🙋♀️完成形がこちら!👇
作業いってみよ~~✊☺️
プラグイン
抜粋文をうまく表示させるために「WP Multibyte Patch」というプラグインをインストールし有効化しておきます。

functions.php
外観>テーマの編集から「functions.php」を開き、一番下でもいいのでわかりやすいところに定義づけの記述をします。
上から3つ並べて書いて大丈夫です。
画像取得
記事の1枚目の画像を取得しトリミングするための記述です。
//一覧ページに記事1枚目画像を表示
//画像サイズをセット
set_post_thumbnail_size( 150, 150, true );
//画像URLからIDを取得
function get_attachment_id_by_url( $url ) {
  global $wpdb;
  $sql = "SELECT ID FROM {$wpdb->posts} WHERE post_name = %s";
  preg_match( '/([^\/]+?)(-e\d+)?(-\d+x\d+)?(\.\w+)?$/', $url, $matches );
  $post_name = $matches[1];
  return ( int )$wpdb->get_var( $wpdb->prepare( $sql, $post_name ) );
}
//画像をサムネイルで出力
function catch_that_image() {
  global $post;
  $first_img = '';
  $output = preg_match_all( '/<img.+src=[\'"]([^\'"]+)[\'"].*>/i', $post->post_content, $matches );
  $first_img_src = $matches[1][0];
  $attachment_id = get_attachment_id_by_url( $first_img_src );
  $first_img = wp_get_attachment_image( $attachment_id, 'thumbnail', false, array( 'class' => 'archive-thumbnail' ) );
  if( empty( $first_img ) ){
    $first_img = '<img class="attachment_post_thumbnail" src="img/image.jpg" alt="No image" />';
  }
  return $first_img;
}
下記には記事に画像がない場合に表示させる画像のURLを適宜入れます(21行目)。
$first_img = '<img class="attachment_post_thumbnail" src="img/image.jpg" alt="No image" />';

アイキャッチ画像を使う場合はこちらのサイト様が参考になります🙇♀️

抜粋文設定
プラグイン「WP Multibyte Patch」用の記述です。
//一覧ページ抜粋文字数設定
function twpp_change_excerpt_length( $length ) {
  return 65;
}
add_filter( 'excerpt_length', 'twpp_change_excerpt_length', 999 );
3行目の数字が表示させる文字数となります。ここでは65文字です。
ちなみにプラグインのデフォルトが110文字設定になっているので、この記述をしない場合110文字で抜粋されます。

新着かどうかを判別
//新着記事判別
function keika_time($days){
    $today = date_i18n('U');
    $entry_day = get_the_time('U');
    $keika = date('U',($today - $entry_day)) / 86400;
    if ( $days > $keika ):
        echo '<div class="entry-icon-new">New</div>';
    endif;
}
これを書くことで後ほど「更新して〇日間以内なら新着表示」という設定ができます。

archive.php
上記の定義を元にしてページにデータを出力させていきます。
外観>テーマの編集から「index.php(投稿トップの一覧表示テンプレート)」「archive.php」を編集します。
使用しているテーマや表示させたいページによってどこを変えるかは異なるので注意。
今回の使用テーマはデフォルトで入っている「Twenty Seventeen(をカスタマイズしてるやつ)」です。
「archive.php」内に下記の記述があれば、
<?php
		if ( have_posts() ) : ?>
			<?php
			/* Start the Loop */
			while ( have_posts() ) : the_post();

				/*
				 * Include the Post-Format-specific template for the content.
				 * If you want to override this in a child theme, then include a file
				 * called content-___.php (where ___ is the Post Format name) and that will be used instead.
				 */
				get_template_part( 'template-parts/post/content', get_post_format());
			endwhile;
次のように書き変えます。
<?php
    if ( have_posts() ) : ?>
      <?php
      /* Start the Loop */
      while ( have_posts() ) : the_post();

        /*
         * Include the Post-Format-specific template for the content.
         * If you want to override this in a child theme, then include a file
         * called content-___.php (where ___ is the Post Format name) and that will be used instead.
         */

			//ここから変更部分
			//get_template_part( 'template-parts/post/content', get_post_format());
			 ?>
			<div class="clear archive_col">
				<div class="f_left">
					<?php if( has_post_thumbnail() ): ?>
					  <a href="<?php the_permalink(); ?>"><?php echo get_the_post_thumbnail( $post->ID, 'thumbnail', array( 'class' => 'archive-thumbnail' ) ); ?></a>
					<?php else: ?>
					  <a href="<?php the_permalink(); ?>"><?php echo catch_that_image(); ?></a>
					<?php endif; ?>
				</div>
				<div class="f_right">

					<!--更新から「30」日以内ならNewを表示-->
					<?php keika_time(30);?>

					<!--タグを取得しリストで出力-->
						<?php
						$posttags = get_the_tags();
						if ( $posttags ) {
							echo '<ul>';
						  foreach ( $posttags as $tag ) {
							echo '<li class="'.$tag->slug.'"><a href="'.get_tag_link( $tag->term_id ).'">'.$tag->name.'</a></li>';
						  }
							echo '</ul>';
						}
						?>

					<!--記事タイトル-->
					<h1 class="entry-title"><a href="<?php the_permalink(); ?>"><?php the_title(); ?></a></h1>
					<!--記事抜粋文-->
					<?php echo mb_substr(the_excerpt(), 0, 400); ?>

				</div>
			</div>

			<?php
			endwhile; ?>
記事全文を表示させているのは書き変え前12行目の
get_template_part( 'template-parts/post/content', get_post_format());
ここの部分なので、削除するか、今回はいったんコメントアウトしています(書き換え後14行目)。
そこに一覧表示にするHTMLを入れますが、そのまま入れるとエラーなので一度PHPの閉じタグを入れ、HTMLの後にまた開始タグを入れていきます。
HTMLの構成はこんな感じです。
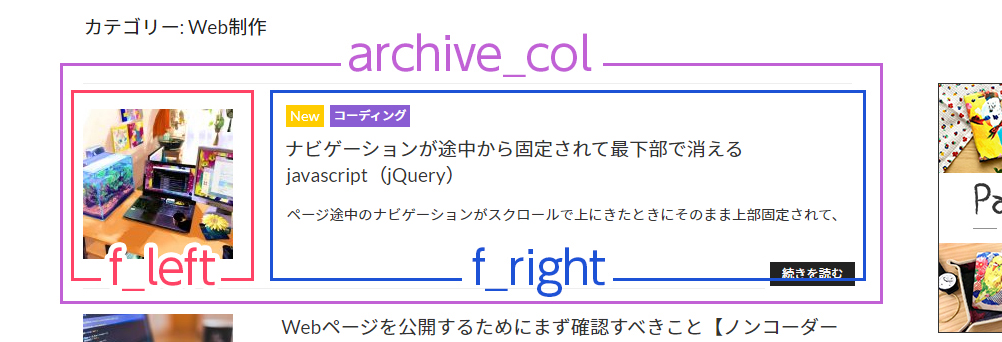
27行目で()内で日数を指定して新着記事に「New」を表示。
30~39行目でタグ表示の設定をしています。
タグの色分けは、liのclassに取得したスラッグを出力して、CSSで色を変えられるようにしています。


抜粋文は41行目で出力されています。
fanction.phpで設定した表示文字数より大きい数字(今回は400)を設定すると「…」と「続きを読む」が現れます。
「400文字取得した中の65文字抜粋して表示させる」ということかな?と思います🤔
CSS
表示を整えるCSSを記述します。
外観>テーマの編集>style.css、または外観>CSS編集からテーマの編集画面で追加CSSに追記します。
.archive_col {
	border-bottom: 1px solid #eee;
	padding: 25px 0 20px;
}
/*最初の記事表示にborder-topをつける*/
.archive_col:first-child {
	border-top: 1px solid #eee;
}
/*1ページに表示させる最後の記事(ここでは10記事目)のborder-bottomを消す
(デフォルトのページネーションとかぶるので)*/
.archive_col:nth-child(10) {
	border-bottom: none;
}

/*サムネイル表示用*/
.archive_col .f_left {
	float: left;
	width: 22%;
}
/*タイトル・抜粋文表示用*/
.archive_col .f_right {
	float: right;
	width: 74%;
}

/*新着*/
.archive_col .f_right .entry-icon-new {
    background-color: #ffcc00;
    font-size: 90%;
    color: #fff;
    margin-right: 5px;
    padding: 0px 4px 2px;
    font-weight: 500;
    display: inline;
		vertical-align: top;
}

/*タグ*/
.archive_col .f_right ul {
    display: inline-block;
    list-style: none;
    margin: 0;
    padding: 0;
}
.archive_col .f_right ul li {
    float: left;
    margin-right: 5px;
    line-height: 1.5;
}
.archive_col .f_right ul li a {
		background-color: #85adb3;
		color: #fff;
    font-size: 85%;
    padding: 3px 4px;
    font-weight: 500;
}
.archive_col .f_right ul li a:hover {
	opacity: 0.8;
}
 /*各タグ色分けCSS(class名とスラッグに同じ英単語を設定する)*/
.archive_col .f_right ul li.coding a {
		background-color: #8a5dd3;
}
.archive_col .f_right ul li.wordpress a {
		background-color: #6f6f6f;
}

/*タイトル*/
.archive_col .f_right h1 {
	clear: none;
	display: inline;
}
/*抜粋文*/
.archive_col .f_right p {
	line-height: 1.8;
  margin: 10px 0;
}

/*続きを読むボタン*/
.archive_col .f_right .link-more a {
	float: right;
	background-color: #222;
	box-shadow: none;
  color: #fff;
	cursor: pointer;
  display: inline-block;
	font-size: 85%;
  line-height: 1;
  padding: 0.5em 1em;
  text-shadow: none;
	transition: background 0.2s;
}
.archive_col .link-more a:hover {
    background-color: #767676;
    color: #fff;
}テーマやテンプレートで変わるのでこのままコピペも難しいかもですが、お役にたてれば幸いです!🙇♀️
